Details on Rooms
Information about the dialog Rooms in duct network calculation.
You are here:
Room overview
The room overview shows the rooms and their location in the building in a tree structure. All spaces from the model are recorded and displayed in the overview. If you have already selected MEP spaces in the model before opening the dialog, the selected spaces are highlighted in the room overview and the project/storey options are displayed.
Search rooms
You can search the room overview for specific rooms or filter it with regular expressions (RegEx, ECMAScript variant).
Filter
Opens a context menu where you can filter the room overview by error or ventilation type. Rooms that are hidden by filters will be ignored when changes are made using the functions Assign room type for ... and Assign minimum volume flow rate for: ....
 : Reverses the order of storeys in the room overview.
Select rooms in model <
Select rooms in the model so that they are subsequently highlighted in the room overview.
Air outlet without room: …
In this area you manage the air outlets that are not assigned to any room.
 /
/ : Use these buttons to switch between the air outlets.
 : Shows the selected air outlet in the model.
Add to: …
Assigns the selected outlet to the room selected in the room overview.
Options on room level
These options are displayed when you select a room in the room overview.
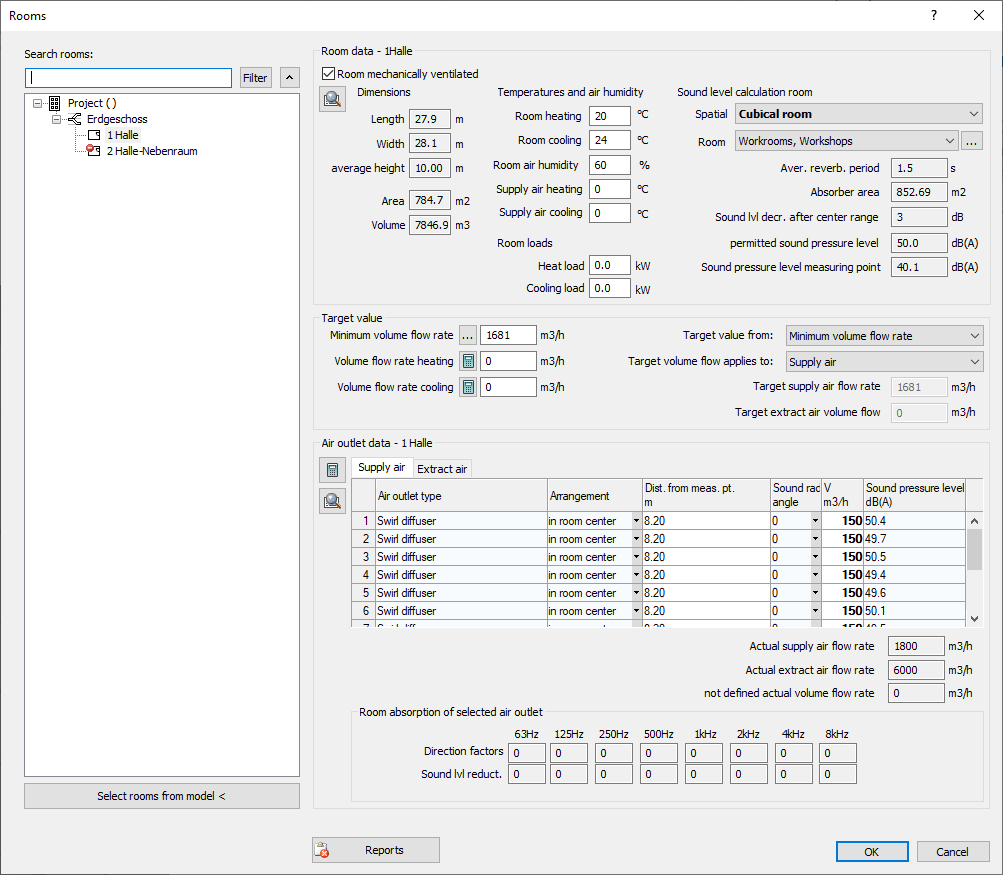
Room data
All room-specific data, if available, is read from the properties of the rooms. These include, for example, the dimensions, the room temperatures or the heating and cooling capacity.
Target value
In this area you determine the target volume flow of the room and determine if the target volume flow should be applied to supply and extract air or only to one of the two volume flow rates. Depending on the setting, the target volume flow results from the minimum volume flow, the volume flow for heating, and the volume flow for cooling, or from your manual specification. Optionally, the minimum volume flow rate can be determined according to DIN EN 16798-1 method 1 and/or method 2.
Air outlet data
This area displays the distribution of the volume flow rates among the air outlets and the room absorption of the selected air outlet.
Reports
Clicking Reports opens a dialog with the errors of the the selected room.
Project and Floor Level Options
These options are displayed when you select the project level or a floor level or multiple rooms in the room overview.
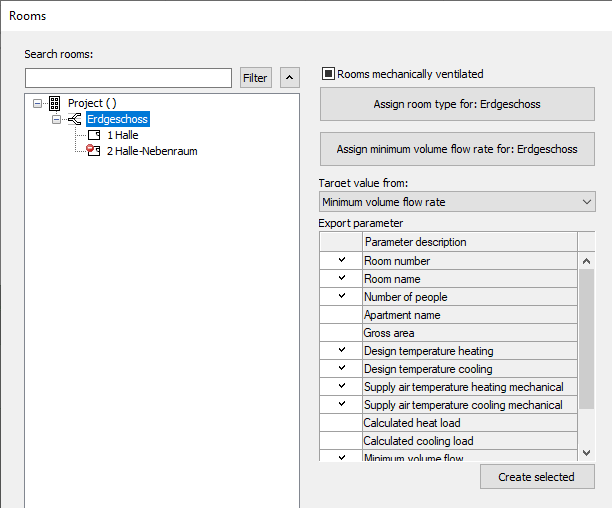
Room/Rooms mechanically ventilated
Enabled: All rooms of the project or the currently selected storey or the selected room are mechanically ventilated through air diffusers.
Semi-activated: Some rooms of the project or the currently selected storey are mechanically ventilated through air diffusers.
Disabled: The rooms of the project or the currently selected storey or room are not mechanically ventilated through air diffusers.
Assign room type for: …
If you selected the project or a floor in the room overview, you can use the Assign room type for: button. ... To assign the same room type to all rooms of the project or storey.
Assign minimum volume flow for: …
Opens the dialog Minimum volume flow rate according to EN 16798-1, in which you can select the method for determining the minimum volume flow rate for the project or for the currently selected storey.
The buttons Assign room type for: ... and Assign minimum volume flow for: ... are applied to all displayed rooms of the selected storey. Filtered rooms are not displayed and ignored accordingly.
Target volume flow from
Defines which volume flow is included in the calculation as target volume flow by default. The default settings for all volume flows to be used can be defined at the project level for all rooms and separately at the individual storeys for the respective rooms. If necessary, the selected volume flow can be adjusted on the respective room levels.
Export parameters
If you have selected the project or a storey in the room overview, you can select parameters to be saved in the room data of the MEP space. After clicking Create selected, the parameters are created in the room data. When you exit the Rooms dialog with OK, all values of the parameters stored in the room are updated.