Details on Room Allocation
Information on the dialog Default Settings for importing component lists from an Excel file.
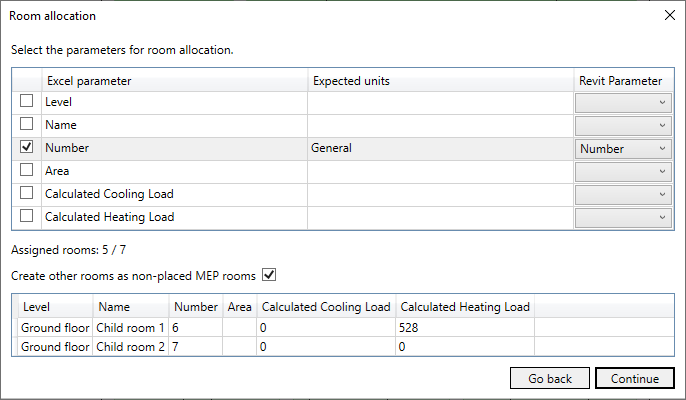
This dialog appears if the Room allocation mode was selected in the Presettings dialog when importing. The room allocation is carried out by assigning the column names of the Excel file to the corresponding Revit - parameters.
You are here:

Room allocation table
Defines the parameters which are used for room allocation. Several parameters can be used for a unique classification. For parameters that are displayed in decimal numbers, no clear classification is possible.
| Column | Description |
|---|---|
| Column 1 | Enabled: The parameter is used for room allocation. |
| Excel parameter | Shows all parameters from the list to be imported. |
| Expected units | Shows in which units the parameters are transferred to the Revit - model. The expected unit depends on the assigned Revit - parameter. |
| Revit parameter | Determines which Revit - parameter is assigned to the Excel - parameter for the allocation All Revit - parameters which can be used for room allocation are listed in the drop-down list. Both write-protected and non-write-protected parameters are displayed. Tip: You can enter parameter names or their initial letters in the drop-down list to go directly to the position of the parameter you are looking for. |
Not assigned rooms or components
Assigned rooms: …/…
Shows the number of already assigned rooms. In front of the forward slash is the number of assigned rooms. Behind the forward slash is the sum of the rooms of the list to be imported.
Create other rooms as non-placed spaces
Enabled: Rooms which could not be assigned by the room allocation are added to the project as non-placed spaces. All parameters which are not set here are set with the Revit - default values.
Table of not assigned rooms
Lists the rooms that could not be assigned by the room allocation with the parameters provided in the list.