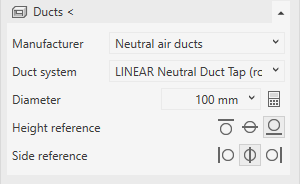
Details on Ducts
Information on the Ducts section.
You are here:

Ducts <
Construct ducts with the selected material and dimensions. The duct is inserted at the height of the construction level. The height reference (top, center, bottom) is taken into account.
If you continue to construct on an existing duct, the dimension of the existing duct is adopted, regardless of the diameter you have selected in the Ducts section. If you do not want to apply the dimension of the existing duct, deactivate the Apply dimension button in the Revit ribbon. The dimension transfer does not work for section views.
Manufacturer
Here, all manufacturers are available, whose data sets have been installed and, if necessary, have been licensed.
Duct system
Here you can select all systems that are contained in the selected manufacturer data set.
Diameter or Width/Height
Depending on the duct system, you select either the diameter (round duct) or the width and height (oval duct, rectangular duct) of the duct. All dimensions of the selected duct system are available for selection.
Calculator /Dimensioning aid ... 
Opens the Calculator dialog in which you can calculate the expected dimensions required for air duct sections by specifying the required volume flow and the maximum flow velocity.
Height reference 
Determine whether the construction level should refer to the upper edge, the middle or the lower edge of the duct.
Orientation
Determine whether the cursor should be aligned to the left edge, the center or the right edge of the pipe while drawing. The setting remains active even if you change the dimension.