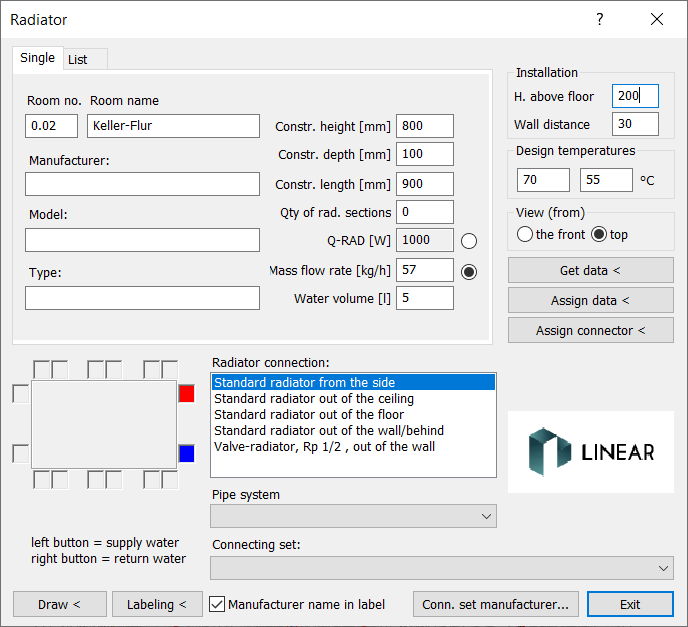
Details on Radiators
Information on the Radiators dialog.
You are here:

Tab single
Room No./Room name
Specify the data for the room where the radiator will be placed.
Manufacturer/Model/Type
If necessary, enter data for the radiator model here.
Radiator height/length/depth [mm] / Qty of rad. Sections / Q-RAD [W] / Mass flow rate [kg/h] / Water volume [l]
Enter the technical data for the radiator here.
Tab list
On the List tab of the Radiator dialog, you can import radiator data from a PRO file. The radiators can be drawn in from the list and be labeled. In the radiator list, the number of the building section, storey, apartment and room is also displayed. The check mark in the first column indicates whether the radiator has been drawn in. The Single tab displays the additional data of the selected radiator.
Installation
H. above floor
The height above the floor refers to the set construction height.
Wall distance
Distance of the radiator from the wall.
Design temperatures
Specifies the design temperatures for the radiator.
View (from)
front / top
Sets the view of the radiator. Select the appropriate view for the floor plan or pipe run view. The front and top options are not available in 3D mode.
Location of connection
Do a left click for the feed and a right click for the return in the small boxes of the schema to determine the connection position.
Radiator connection
Select from where the radiator will be connected later. This setting determines the length of the connections for supply and return so that the feed pipes do not cross. If you have selected a specific manufacturer, it is also defined which connecting set is used. In the pipe network calculation with LINEAR Analyse Heating, this material appears in the parts list.
Manufacturer name in label
If you uncheck the box, the manufacturer name will not be output in the label, even if it is included in the label block.
Conn. Set manufacturer...
This button takes you to the dialog for selecting a specific manufacturer for the connecting set. After that, depending on the Radiator connection and the Pipe system, you can select specific connecting sets that will be output in the parts list in LINEAR Analyse Heating. Manufacturer data is only available if it has been installed and licensed.
Get data
With this button you can display the data of an already drawn radiator. Click the button and then select a radiator in your drawing. The radiator dialog then displays the data of the corresponding radiator.
Assign data
This button allows you to assign new data to a radiator. Change the details in the radiator dialog and click Assign data <. Then select a radiator in your drawing.
If the dimensions or the connection position are changed, the radiator is automatically redrawn and any existing connections are automatically recreated. The current settings from the Rigid connection < command are used. The changes should be made before the fittings are placed, as they are not automatically reset.
Assign connector
This button allows you to assign new connections to a radiator. Change the details in the radiator dialog and click Assign connector. Then select a radiator in your drawing.
If the dimensions or the connection position are changed, the radiator is automatically redrawn and any existing connections are automatically recreated. The current settings from the Rigid connection < command are used. The changes should be made before the fittings are placed, as they are not automatically reset.
Draw <
After clicking Draw < you can place the radiators in the drawing according to the default settings. The radiator then appears at the mouse pointer and you can select a position in the room.
Labeling <
The labeling block selected in the Configuration menu on the Planning tab is usually used for labeling. If a radiator is already labeled and the labeling block used differs from the one in the configuration, the previous labeling type is used. This allows you to label the radiators even in older drawings without having to select the block in the configuration beforehand.