Transfer View Properties
Shows step-by-step how to transfer view properties from the current view to other views of your project.
Before you begin
You want to transfer the view properties of one of your views to other views in your project.
Requirement:
Your project contains at least two views.
Navigate to:

Procedure
- Activate the view whose properties you want to transfer.
- In the Productivity group, click Transfer view properties.
The Transfer view properties dialog opens.
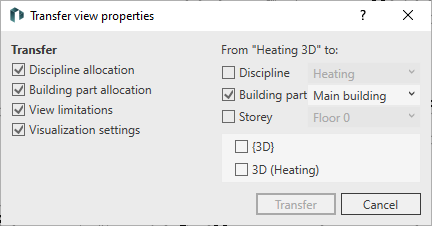
- In the Transfer area, activate the checkboxes for the properties that you want to transfer to other views.
- Optional: If required, filter the available views in the From “Name of current view” area:
- Activate the Discipline checkbox and select the desired discipline from the drop-down list.
- Activate the checkbox Building part and select the desired building part from the drop-down list.
- Activate the checkbox Storey and select the desired storey from the drop-down list.
- Activate the check boxes of all views to which you want to transfer the properties of the current view and click Transfer.
Results
You have transferred the selected properties of the current view to other views of your project.