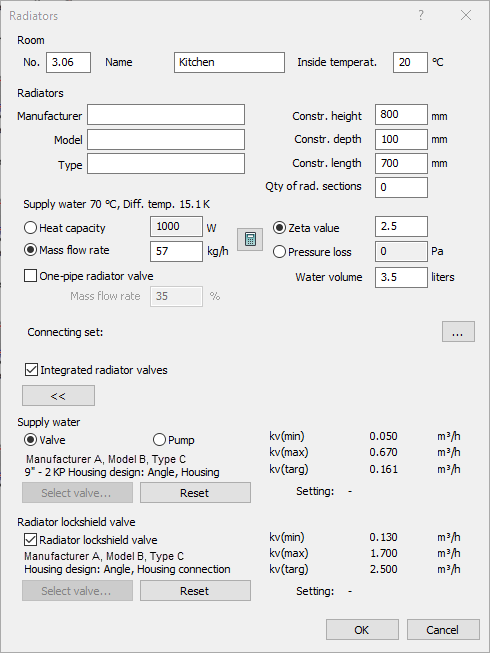
Details on Technical Data for Radiators
Information about the component data dialog for Radiators.
You are here:

Room
No. Enter a consecutive number for the room. This field is alphanumeric.
Name The name of the Room.
Inside temperature Enter the desired inside temperature for this room. This input is not considered for calculation but merely serves to complete your model.
Radiators
Manufacturer, Model, Type: Here, you can enter the manufacturer, the model and the type of the radiator. This input is part of the parts list.
Construction height, Construction depth, Construction length, Quantity of rad. sections: Measurements of the radiator are, like the manufacturer’s name, part of the parts list. This input also is not considered during calculation.
Heat capacity: Enter the capacity with which this particular radiator is to be considered during calculation or that is to be reached when dimensioning, respectively.
Mass flow rate: Instead of heat capacity, you can enter the mass flow rate. The heat capacity is automatically calculated using the supply/return temperature set in the heating pipe network calculation. For radiators coming from LINEAR Building, the mass flow rate is transferred.
Zeta value, Pressure loss: The zeta value of the radiator also indicates the pressure loss coefficient. Valves are not included in this value. Alternatively, you can enter the absolute pressure loss of this radiator. Activate the desired value.
Water volume: Water volume will be used to calculate the system volume and for dimensioning the diaphragm type expansion tank. If the water volume has not been specified, a report will be issued during calculation. This only occurs with a diaphragm expansion tank installed. Radiators coming from LINEAR Building already carry this information.
One-pipe radiator valve: You can also use radiators along with one-pipe systems. Since in those cases calculation is different, specification of mass flow rate and selection of a one-pipe radiator valve is required, the radiator must be drawn accordingly.
Connecting Set
Integrated radiator valves: If the thermostatic valve and the radiator lockshield valve have been drawn as separate components, you can switch off the integrated radiator valves here. This prevents that two valves appear in the calculation for this radiator.
If you activate this option, the radiator valves need not to be drawn. They are available via the valves button in the calculation.
Supply Water and Radiator lockshield valve
The currently selected valve is shown. To the right, the cv-values (min, max and target) and settings of the valve are shown (after calculation). These values also appear in the printout.
Select valve...: After the initial calculation, the program tries to insert a fitting valve from global valve selection. You may select a different valve for individual radiator in case those from global preselection are not suited. If the shown valve has been inserted from global valve selection, the button Reset will be deactivated. If the shown valve has been manually selected for this radiator, the button Select valve... will be deactivated.
Reset: Use this button to limit the selection of valves to those which are already contained in the global armature preselection. If you click this button, a local assignment made before will be reset.
Valve or Pump, respectively: In case you do not want to use thermostatic valves but a decentralized pump system, activate the radio button Pump.
Radiator lockshield valves: The radiator lockshield valve can be deactivated. If a lockshield valve has been entered here before, it will only be deactivated. Reactivating this option will load the previously made selection. Thus, the data will not be lost.
The total cv value to be set is approximated with the thermostatic valve and then, using the radiator lockshield valve, set to be as accurate as possible. The re-calculated total cv value based on this setting will then be included in the calculation as pressure loss.